Friday, October 12, 2018

Learning to Shut Up and Eat

Hello, my friends! I'm so sorry for the long silence, but I just got back from a visit to Italy where I spent three weeks just EATING. And drinking. Definitely drinking. Actually, I think I'm going through an Aperol spritz withdrawal...

But really. The trip was incredible. I've gained 6 happy pounds and a slew of new friends, who are all my next-door neighbors' family. So many of my happy memories are of sitting around their tables, eating course after course, speaking horribly bad Italian and learning that listening attentively for hours on end for any word that helps me understand what someone is saying is exhausting. But, man, is it fun!

Perhaps the biggest lesson that I learned on this trip, however, was simply to SHUT UP AND EAT. I mean it. So many times I (and I think you do this, too) tell myself that I will not like a particular food or dish, and so—ooooh, shocker—I DON'T!

At the start of this trip, I decided that I wasn't going to do that anymore. I wanted to step up my food attitude even more after my recent virginal experience with raw oysters,

Fresh raw oyster from Cape Cod, Massachusetts

so instead of negatively prepping my brain when faced with an un-experienced (yes, I made that word up) food this trip, I was going to leave my mind open upon first bite/slurp/lick/etc. and see how my taste buds responded.

And so I ate things that I never would have eaten before.

Like this salad at Garraffo in Palermo, Sicily:

Octopus salad at Garraffo in Palermo, Sicily, Italy

And this steak at Uncle Franco's:

Grilled horse meat steak

And this snack at Cousin Sebi's:

A bowl of fresh, hot ricotta cheese and whey with bread

The first was flash-seared octopus that, if I had been blindfolded while eating it, I would have thought by texture and taste that I was eating a steak. Insanely delicious.

The second was horse. Yes. CAVALLO. So good I had it twice.

The last was a piping hot bowl of sheep-milk ricotta cheese with the whey, eaten by spoon with fresh bread chunks to soak up the whey. I thought I had died and gone to comfort-food heaven.

NEVER would I have eaten any of these dishes if I had followed my immediate reaction of I-won't-like-this. And, oh, what I would have missed out on!

I challenge you to try it: STOP TELLING YOURSELF YOU WON'T LIKE A FOOD.

Just shut up—and eat.

Saturday, August 11, 2018

Perfectly Thin, Duck Fat-Fried Potato Crisps

Oh, dear readers. So much to write about but so little time. This summer has been flying by. It's been a hot one, too, which doesn't seem to jibe. Doesn't heat usually seem to make things drag? Well, not here. Between doing lots of work (I published my second book! Go grab a copy of Reading Toward Success on Amazon!), doing a good bit of travel, and having lots of guests, I feel like I've barely been able to keep up—in a good way. Chef Reiton and I love to entertain, which goes hand-in-hand with having lots of guests. Whether it's for one friend, two friends or 30 friends, we've been cooking up a storm this summer.

One of the things that I've gotten really into making is potato chips. I found a recipe in one of my Alton Brown cookbooks, I believe, and I made them on a whim one night. After our friend Mario's "Dear God!" exclamation after his first bite, I haven't been able to stop making them.

The first time I made them, I cut them with a standard vegetable peeler, per Alton's instructions. These chips were delightfully thin, but they were a pain-in-the-butt to cut. Careful, even pressure needs to be applied to get a whole slice of potato and not a wonky sliver, and for those who know me and my hand-eye coordination, that didn't work so well.

The next time I made them, I hand-sliced them. Using a beautifully sharp chef's knife, this worked out just fine. Except the anal side of me was upset at the lack of perfect uniformity in slice-thickness.

I finally came to a decision: it was time to visit Amazon.

For a long time, I have been wanting to replace my mandoline. No, I do not play a stringed instrument. I'm speaking of a kitchen tool that makes insanely thin slices of just about anything you want. The Norpro version that I have just hasn't held up. The blade has become dull, which means the mandoline has become dangerous to operate, and, frankly, I don't want to be losing any parts of my fingers or hand, no matter how tiny a slice. Bon Appetit magazine has highly recommended the Benriner Old Version Vegetable Slicer, and so that was the one I bought.

Baby, is that thing awesome! When I took my first swipe, the slicing was so smoothly done I had to check to make sure that it had actually sliced (unlike my Norpro that gave my veggie a tug every time I swiped downward. Yikes!). And for about the same price as a Norpro—AND the ability to change blades—I'm never going back.

Another thing I'm not going back on? Duck fat.

Yes, my friends—duck fat. After having a couple jars for a stupidly long time and "being afraid to use them" (MAJOR eye-roll here...), we let our friend, Chef Wilkinson, use them when he came over and made us a French meal the other night that included pomme frites: French fries fried in duck fat.

Potatoes fried in duck fat, once tasted, will change yet another aspect of your kitchen life. Trust me. The taste is full and deep, unlike vegetable fats. It's not a cheap fat, but it is an insanely delicious and healthy one that can be reused over and over again. Just strain it after it cools down and store it in the fridge.

So. Now for another test: I sliced my exquisitely even potato chips using my beautiful Benriner mandoline, gave the slices a good 20-minute soak in some hot water, rinsed them, and patted them dry. Meanwhile I heated about 3 cups of duck fat in a medium saucepan to 355°F. Once the fat was hot, I slipped four or five slices of potato into the fat one at a time, held them under the surface with a spider strainer and flipped them occasionally. When they were a lovely golden brown, I pulled them out, immediately sprinkled them with kosher salt, and drained them in a paper-towel lined bowl.

How did those duck-fat potato chips turn out?

Idaho potatoes sliced on a Benriner mandoline and fried in duck fat

Perfect.

Friday, June 29, 2018

A Drink at Drink and Dinner at Oak + Rowan — Boston, MA — A Bar and Restaurant Recommendation

Last weekend was my and Chef Reiton's anniversary (WOOHOOOO!), so we decided to do that go-do-a-night-on-the-town thing to celebrate our six years of awesomeness. One of my besties got us a hotel room down in the Seaport district, a section of Boston that used to be SCARY but has recently made huge strides in becoming possibly the hippest neighborhood to play and live in, and with reservations to a new bar and a new restaurant to try, we hopped in an Uber and headed downtown with our overnight bag in tow.

After check-in and a cat nap, we walked over to a bar we had been wanting to try for a while called Drink. We arrived shortly after it opened for the evening and headed down the stairs to be welcomed at the bottom by the hostess. I could see it was already hopping inside, despite only having been open for half an hour—and I mean "hopping" to the point that the hostess asked if we were okay standing at the bar while we waited for a seat to open.

"Sure!" we said. "No problem," and we were led to a private little section of bar that was actually a door through the bar front and only about a foot deep. This, I realized, I liked as soon as our bartender walked up. It was personal and intimate bar service like I'd never had before.

As we waited for our drinks, I took a good look around. A bare-bones establishment of concrete, black pipe, brick and Edison bulbs, Drink's decor vibe is definitely lacking—for some. If you like to go eat or drink at restaurants just because they look pretty, Drink is not for you.

HOWEVER...

if you love a bartender that treats you like an old friend, fries that will blow your mind and cocktails created just for you and your specific taste for...je ne sais quoi, Drink is for you.

The french fries with housemade malt vinegar aioli at Drink, a bar in Fort Point, Boston, Massachusetts

Cocktails at Drink, a bar in Fort Point, Boston, MA

I could have stayed at Drink all night, but our dinner reservation at Oak + Rowan was drawing nigh. We thanked Jackie, our bartender, for a wonderful afternoon and headed out the door and up the stairs—which were now packed with a long, long line of people that went out the door and was beginning to wend its way down the block. Note to self: visit Drink at 4:10 PM (and ask for Jackie!).

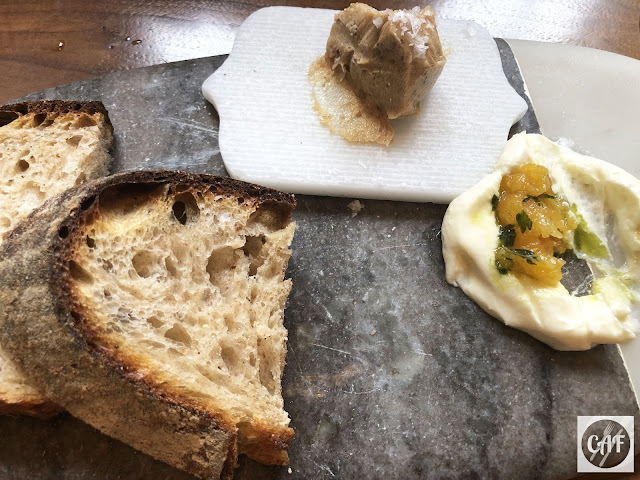
Oak + Rowan, it turns out, is another minimalist restaurant. Elegant and warm but simple and clean (with windows galore—love!), we were greeted with warmth and welcome and seated in a lovely corner booth. And the warmth and welcome continued when our server, Patrick, approached the table and began what would be an absolutely heavenly evening. Yes, it was a bit pricey. And, yes, you pay for your bread at Oak + Rowan. But you are so SO happy you did once you take your first, warm, homemade, chewy, sourdough-y, date-buttery bite.

Homemade whole wheat sourdough bread and housemade date butter at Oak and Rowan restaurant, Fort Point, Boston, MA

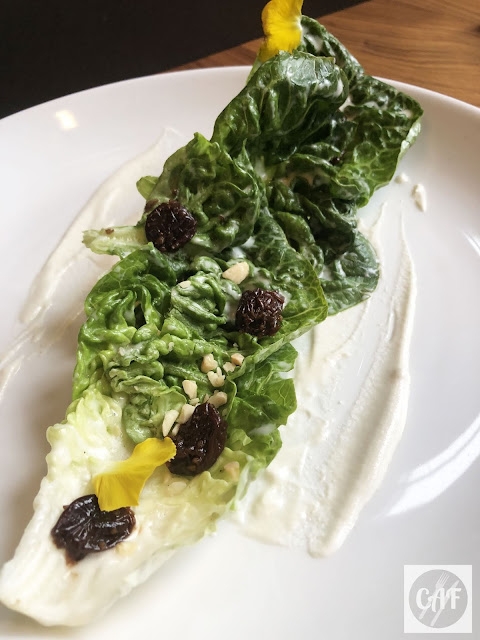
And then there is the butter gem lettuce salad sprinkled with flower petals and cherries. 

Butter gem lettuce salad at Oak and Rowan, a restaurant in Fort Point, Boston, MA

And the gnocchi drizzled with nettle (yes, nettle) pesto and nestled in mozzarella and the prettiest broth you ever did see.

The gnocchi at Oak and Rowan, a restaurant in Fort Point, Boston, MA

And then...the dessert. THE DESSERT. I don't remember what it was called, but ask for the deconstructed Twix bar sent from the gods, and you won't be sorry. Maybe sick with happiness at this point, but definitely not sorry.

The chocolate "Twix" dessert at Oak and Rowan, a restaurant in Fort Point, Boston, MA

As we waddled our way back to the hotel, oh, the swoons. The sighs! The evening could not have been more deliciously perfect. 

The whole weekend could not have been more perfect, actually. And we keep finding ourselves talking about the Seaport and it's lovely inhabitants and saying to each other, "Let's go back. Soon."

Friday, June 22, 2018

Toast-less Avocado Toast: The Paleo Version

Food fads both fascinate and frustrate me. Being one who loves to learn anything new in the kitchen—whether it be a new taste for something or a new technique—I'm open to most (most, mind you) anything.

And so when I hear that such-and-such is so flipping good, and I see blog posts and magazine articles singing its praises, and menu after menu offering said food, I usually will give it a try. See my post on grain bowls as an example...

What frustrates me, on the other hand, is when something in the food world just gets OVERDONE. Like, there is nothing else. I see this with ingredients, flavors, techniques.

Take the word "umami," for instance. The word "umami" was first used by Kikunae Ikeda in 1908. 1908!!! But it is used now as if it is the newest and most insanely incredible taste that has ever been discovered. If I hear or read the word "umami" one more time, I'm going to take my bottle of coconut aminos and throw it out the window! (Although I do encourage you to read the "Umami" Wikipedia article for a rather fascinating explanation of its meaning.)

So when I keep reading articles about entire restaurants being dedicated to this whole avocado toast craze??? I admit, I've been rolling my eyes. Really? All you serve is toast with avocado schmeared on top and sprinkled with random crap? I mean, come on.

And then, one day last week I had nothing to eat in the kitchen except a perfectly ripe avocado...

So, this is what happened:

Avocado sprinkled with lime juice, toasted hazelnuts, olive oil, salt and pepper

Avocado. Fresh squirt of lime juice. Sprinkle of toasted hazelnuts. Drizzle of olive oil. Salt. Pepper.

My brain's response after my first dreamy, creamy bite from my spoon: DEAR GOD, THANK YOU FOR THIS FOOD.

What was I eating? I was eating a toast-less version of avocado toast, and it was divine

Monday, April 16, 2018

Hand-Ground Meat: A Lesson in Economy—and Deliciousness

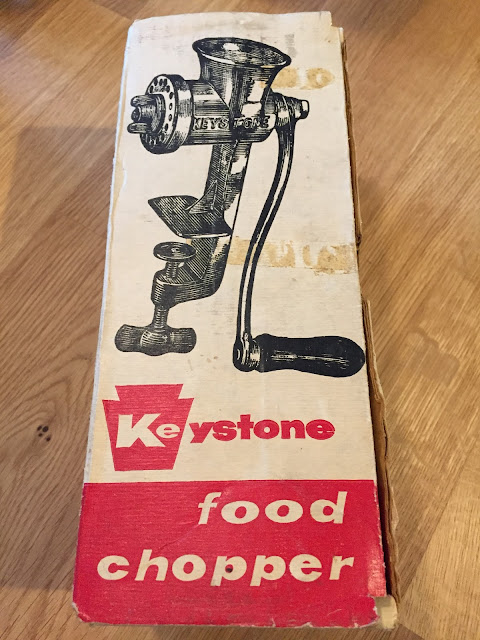
Years ago my mother gave me a meat grinder that she found at an auction. I'm not talking a mixer attachment-kind of meat grinder. I'm talking an OLD-school meat grinder. The kind that clamps onto a table and you crank chunks of meat through it with a big, long handle.

Here...this is it:

Old-fashioned meat grinder in box

So, for years that grinder has sat in my cabinet. Like, in the back of the cabinet. I completely forgot it existed.

And then the other night,  as I stared at Bon Appetit's latest photo of larb in their April 2018 issue, the words suddenly came to my head:


MEAT GRINDER


Seriously. They did. Just like that:


MEAT GRINDER.


Maybe it was the texture of the ground pork in the photo that jarred my brain. I mean, it looked so...meaty. It definitely did not have a smashed-meat-paste-dumped-from-a-styrofoam-tray look to it.

Anyway, regardless of how it all happened, the next thing I knew I was telling Chef Reiton that we should just grind our own pork when we make the larb recipe, and he agreed wholeheartedly. I mean, why not? We had that lonely, ill-used (as in not used) grinder just sitting there, waiting...

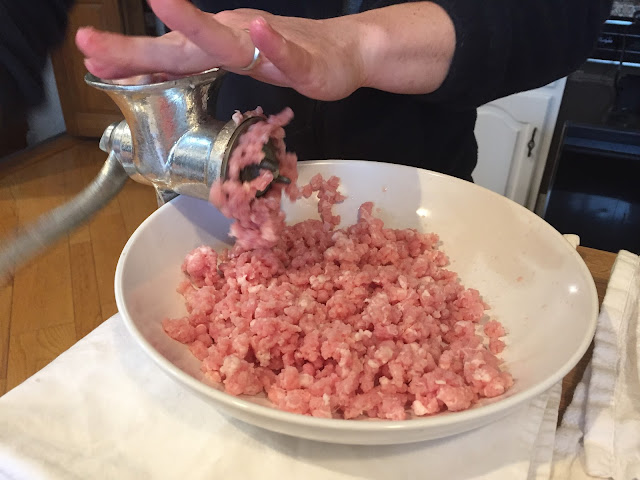
So, we did. We took our boneless pork chops, cut them up into chunks and put them through our old-fashioned, crank-that-handle grinder.

Hand-grinding boneless pork chops for making larb

How's that for an action shot, huh? And look at that texture! Perfectly sized meaty bits of pork that will still have a tender bite when browned to perfection. 

As I was grinding away, I was reflecting on the simple beauty of being able to see the chunks of meat going into the feed chute and knowing exactly what kind of pork I would be eating in my larb. I don't know about you, but whenever I buy ground meat at the store, I have fleeting thoughts that I don't  really having any idea what pig parts went into this ground pork package in my hand... The company isn't required to say. As long as it comes from a pig, it's labeled "pork," so—I'll leave you with that thought. 

And here's the BONUS big deal that I realized as I was grinding that beautiful meat: when you go to buy ground pork the next time you are at the grocery, take a look at the price of boneless pork chops or country-style ribs vs. the ground pork package. Pound per pound, the boneless pork is typically cheaper. And if you are grinding it yourself, you don't need to buy the pretty pork. You want to buy the cheaper, fattier, ugly, boneless cuts. They will make your ground meat more flavorful. Win-win for you and that ugly pork. I can tell you firsthand: the flavor of the larb with our hand-ground pork was PHENOMENAL.

So now I'm thinking of all the other meats I can grind. Cheap-o, skin-on chicken thighs for my little Middle Eastern chicken patties? WAY cheaper than ground chicken mush. And all that deliciously fatty skin that will actually add FLAVOR to the dish? Oh, heck, yeah! 

And how about ground beef for my burgers? Hand me those cheap, nobody-loves-me cuts of beef, baby, and I'll grind them down to a luscious mound of beefy goodness. 

All because of the new love-of-my-kitchen-life: my meat grinder.

Sigh.

[Cue sappy music and fade out]

Thursday, March 15, 2018

Paleo Plantain French Fries

When you are limited on where your starches come from in a paleo diet, you get creative.

Ladies and Gentleman, the plantain french fry!


Paleo Plantain French Fries

NO, they don't taste exactly like a potato french fry. Of course they don't. They are made from a plantain, not a potato, so don't sit and whine that they aren't the same. They aren't gonna be the same, whiner.

But I'd rather have a salty, crispy-tender plantain fry to munch on than NONE at all.

And I'll leave off the six pounds I've lost in the past two weeks, too.

Thank you, meat and veggies.

Want to make them? We used three plantains for two of us.

Ingredients:
  • green plantains with no yellowing
  • coconut oil
  • kosher salt

Special Tools:
  • a bowl or colander
  • paper towel
  • paring knife
  • skimmer or slotted metal spatula

Directions:
  1. Place the paper towel in the bowl or colander. It will absorb some of the oil from the fries.
  2. Using a paring knife, cut off the tops and bottoms of the plantains. Score through the skin along the natural ridges of the plantain. Slide your thumb under the end of one of the strips and pop the skin up. Slide your thumb up the plantain to remove the strip. Peel all of the plantains completely. 
  3. Start heating the coconut oil in a small saucepan over medium heat. You want a depth that will more than coat the french fry, about 1/2 an inch. (And don't worry about waste. You can reuse this oil to make more fries another time.)
  4. Meanwhile, cut a plantain in half crosswise. Now cut the halves in half lengthwise. Cut the four pieces in half lengthwise again. Turn those pieces on their sides and cut them in half. You may have a few pieces that need turning and cutting in half one more time, depending on the size of your plantains. You should have square-ish fries. Repeat for all of the plantains.
  5. Look back to the oil. You want it hot but not smoking. Test it by tossing in a scrap of plantain. If it immediately bubbles rapidly, it's ready.
  6. Carefully drop in a small handful of fries. Stir gently to move the fries around a bit so they don't stick together. Fry until the plantains are a nice golden brown, stirring occasionally. Remove them from the oil with the skimmer or spatula, tapping the skimmer on the side of the saucepan to allow excess oil to drip back into the saucepan. Dump the fries into the paper towel-lined bowl and immediately sprinkle with kosher salt. 
  7. Repeat until all the fries are done. If you want to keep the fries warm in the oven, you can do so, but I liked snacking while I fried...

Enjoy!

Friday, March 9, 2018

A Paleo Puerto Rican Dinner Menu

What a week. In our second snow bomb storm of the season, the power in our block where "the power never goes out"—went out. Not for thirty minutes. Or an hour. Or the evening.

No, it went out for 24 hours.

Thank goodness it went out after I had pulled the steak tips we were having for dinner from the fridge. AND our stove is gas, so we could light her up and keep cooking. By candlelight.

So, despite the awkwardness of cooking without really being able to clearly see our food, Chef Reiton and I still forged ahead to start our month of going paleo to get these two bodies back on track.

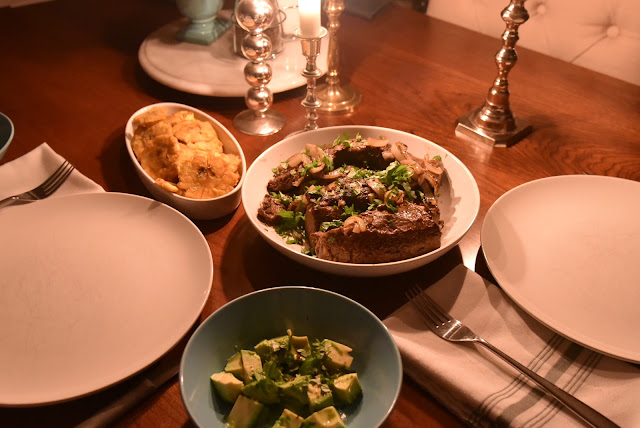
So, here you go, folks: a paleo Puerto Rican dinner, prepared and eaten by candlelight:

  • Pan-Seared Cumin-Lime Steak Tips
  • Simple Avocado Salad
  • Tostones

Recipes:

For the steak tips:

  1. Rinse and pat dry the steak. Sprinkle generously with kosher salt, ground cumin, garlic powder, freshly squeezed lime juice and freshly ground black pepper. Rub it all in. Let meat rest for 15 minutes (while you prep the rest of the dinner).
  2. Cut off the top and bottom of one onion, halve it lengthwise, remove the peel, then slice the onion halves lengthwise into slivers.
  3. Sear meat in a tablespoon or so of coconut oil in a skillet until starting to char. Add onion slivers, and continue cooking steak, turning tips to sear all sides. Toss the onions occasionally.
  4. You want medium-rare to medium in doneness on the steak. Rest under foil on a plate for 10 minutes with the onions. Garnish with cilantro and serve.
For the avocado salad:
  1. Wash and halve avocado(s). Whack into the seed with a chef's knife blade, then twist the blade gently to pop out the seed.
  2. Hold a half in your palm. With a paring knife, CAREFULLY slice through the avocado flesh but NOT the skin, cutting it into cubes.
  3. Take a silverware tablespoon and, sliding the edge of it between the avocado skin and the flesh, scoop the chunks out into a bowl.
  4. Repeat as necessary on additional avocados.
  5. Salt and pepper the avocado chunks, squirt with some fresh lime juice, and toss gently. Garnish with chopped cilantro and serve.
For the tostones:
  1. Heat coconut oil in a small skillet or saucepan to a depth of about 1/2-inch. You can save and reuse this oil several times for this.
  2. Meanwhile, with a paring knife, cut the top and bottom tips off a very green plantain.
  3. Score through the skin of the plantain, following along the natural ridges of the skin.
  4. Take your thumbnail and wedge it under one of the skin strips. Pop up the skin, then slide your thumb up the plantain, peeling off the strip. Repeat the whole way around. Repeat on additional plantains as necessary.
  5. Slice the plantains into 1- to 1 1/2-inch chunks.
  6. Fry the plantain slices in batches to a golden brown, turning once to get both sides. Drain on paper towels.
  7. Smash the fried plantain chunks to about 1/4-inch thick with a plate, tostone smasher, or what have you.
  8. Refry the smashed chunks (tostones) in the hot oil. Remove to a paper towel to drain and immediately sprinkle with adobo seasoning (you can readily find this in your grocery store in the ethnic aisle). Serve.
Paleo Puerto Rican dinner of steak tips, tostones and avocado salad

And there you have it, folks. A paleo Puerto Rican dinner—by candlelight.

Friday, February 23, 2018

Homemade Fish Stock and Hysterectomies

This is going to be a quick one because...well, if you can't tell from the title of my post, I'm a bit laid up compared to my usual self. I'm only writing because, after tonight's experience, I thought maybe I should warn any of you out there who are preparing to have a hysterectomy: do NOT plan on making homemade fish stock within the first week or two of recovery.

Why?

Well, the following scenarios might give you an idea why. Imagine experiencing each one of them sequentially while sporting a 6-inch incision on your lower abdomen that has been glued shut and is surrounded by bruising the color of a yellow highlighter marker.

1.) After bringing the salted heads and skeletal remains of two large, species-less fish, two halved onions, a few sprigs of parsley, some fennel fronds and two bay leaves to a boil in a stockpot, I lift the lid to see this:

Fish lips in homemade fish stock

2.) Upon another stirring of the pot, I lift the lid to see a translucent ball drift to the surface, bob gently in an eddy, then lazily roll over to reveal the iridescent glow of a fish eye staring back at me.

3.) As I get ready to tuck myself into bed in the guest room on the lower level, I get a text from my husband: "It really stinks up here. I think next time we should make fish stock outside."

And now I sit here in bed with an ice pack on my belly because it hurts so much—and I'm still laughing.

So! Just a fair warning to those of you who want to have hysterectomies and then go make fish stock soon after. I caution you: Get that ice pack ready.

Thursday, February 1, 2018

A Grain Bowl Recipe for Skeptics

If you have paid attention to anything food-related this past year, you will know that one of the most popular, healthy, hippie-ish dishes to hit the scene is


The Grain Bowl.


No, it's not your grandmother's bowl of oatmeal, Cream of Wheat or farina. It is a savory dish: a concoction of fiber-full, vitamin-packed ingredients that seem to have absolutely nothing to do with each other that are all piled on top of a base layer of cooked grain—in a bowl.

I don't know about you, but to me that sounds like either an incredibly boring meal or an incredibly healthy-to-the-point-I-don't-want-to-eat-it meal. Was I born in the '70s? Yes. Did my neighbor grow pot in his backyard and eat—right in front of our boggling eyes—the slippery, slimy seaweed that we brought home from the beach? Yes. Did we eat his wife's beans and rice and love it? Yes.

But a grain bowl???

Sigh. It just seems like it's trying too TOO hard to be part of the club, you know?

But the fuss! The number of restaurants popping up and serving these damn things! I mean, seriously.

That means...yup. You loyal readers know me. I decided I needed to give it a try. (I still do have a good three pounds of Italy to come off. And it's already FEBRUARY!!! My male readers will have no idea why I just said that about February. Ladies, you know what I'm saying...)

SO. I decided to start simple. And who did I go to as my guide? My ever-faithful, besties-in-the-kitchen, Bon Appetit mag. (I'm telling you, folks. If you want to learn to cook, subscribe to this magazine. If I could figure out how to get their ad on this blog, that would be the ONE ad I would actually add so you could just click and subscribe. The folks who write it are fun. They are real. They aren't afraid to admit they are still learning in the kitchen, too. They are like US! Woohoo! So, until I can figure out how to get their ad on my blog, here's the link to GO SUBSCRIBE TO BON APPETIT MAGAZINE!)

The picture they put in the magazine that totally tempted me and made me give in can be found on Bon Appetit's website here. I used page 52 of my oh-so-special, January subscriber-only issue of Bon Appetit to guide me and gathered up my bowl ingredients:

  • pearled barley (it's what I had leftover from beef and barley soup)
  • bunch of curly kale (one with smaller, more tender stalks)
  • 2 small sweet potatoes
  • half a brick of halloumi cheese (a Greek melting cheese that has a really nice salty flavor)
  • slivered almonds
  • sunflower seeds
  • coriander seeds
  • and mint leaves.

I put the barley on to boil in salted water for 45 minutes, then got to prepping the rest of the ingredients so they were ready to layer on after the barley was cooked, drained and cooled.
  1. The sweet potatoes were scrubbed, dried, cut into 1-inch cubes, tossed with olive oil, salt, pepper and a little paprika (I like hot but regular, ol' sweet is good) and roasted for 30 minutes at 400° F in my toaster oven.
  2. The curly kale leaves were cut from the stems (toss the stems), sliced crosswise then lengthwise, rinsed, dried and dumped in a bowl. I sprinkled them with a bit of salt and cider vinegar, then massaged them gently for about 30 seconds to start breaking down their tough fibers. The vinegar would do the rest while I moved on to my next ingredient.
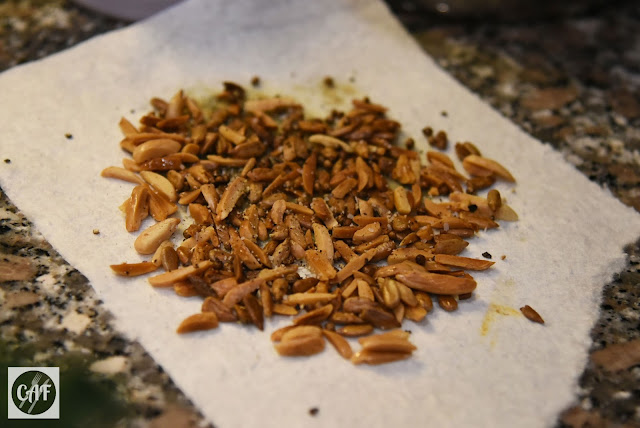
  3. The slivered almonds, sunflower seeds and coriander seeds were tossed on medium heat in a tiny bit of olive oil until they were golden brown and the coriander seeds started popping (about 1 minute), then drained on a paper towel and sprinkled with salt and pepper.
  4. The mint leaves were rinsed, dried, and torn from their stems (stems tossed).
  5. Now it was time for the dressing: In a small jar, I shook together 6 oz. olive oil, the juice of 1 lemon, 1 tsp. Dijon mustard, 1/2 tsp. honey, salt and pepper. This was more than enough dressing, but extra can be used on salad later.
  6. At this point the barley was ready: it had a nice chew to it. It was drained then scattered on a towel-lined baking sheet to dry (I have an abundance of flour sack towels which I use for purposes such as this, not just for drying my hands. I go through a dozen in about three days. Just don't wash them with fabric softener!).
  7. While the barley cooled, I fried the halloumi: I heated up a little bit of olive oil in a small cast-iron skillet (enough to just coat the bottom of the pan), browned both sides of the cheese, then sliced it.
Chopped curly kale for a grain bowl

Fried slivered almonds, sunflower seeds and coriander seeds for a grain bowl

Fried slices of halloumi cheese for a grain bowl

Cooked pearled barley for a grain bowl

Assembling all the parts into a bowl took all of one minute: the barley lined the bottom of a pasta bowl and was topped with a pile of kale greens, a scattering of roasted sweet potatoes, a few slices of fried cheese and a sprinkling of toasted seeds and mint leaves. It all was drizzled with the lemon-Dijon dressing, and voila!


My own, personalized grain bowl!


I think I had had a bit of wine at this point or I was really excited about my creation because I didn't realize until the next morning that I had gotten REALLY close on this pic. But, oh well. Because after I took my first bite of my first grain bowl EVER, I wanted to get that close and stay that close.

Does that mean it was delicious?

Yes.

A party in my mouth?

Yes!

A marching band of foods that combined into a perfect explosion of flavor and texture symmetry?

YES!!!

I think you know what I'm going to say to the "Will I make this again?" question. And you know what the beauty of this meal is? The parts can all be made or prepped ahead and simply reheated or quickly cooked as needed. A weeknight dinner that will make you happy in, OH! So many ways!

So, hippies! Rejoice! You converted a total skeptic, and I will declare it loudly to the world:

I LOVE GRAIN BOWLS!!!


But Dwight, wherever you are: the raw seaweed?

Hell, NO.

Ready to give the grain bowl a try? Leave a comment and let us know what you did! Go crazy! Use what you have and what you like! You'll give us some more ideas of things to try! 

Tuesday, January 16, 2018

Make the Most of Your Food Budget: A Weekly Dinner Menu and Shopping List

About a year ago I wrote a post about being smart about how you shop for produce. And while I shop for a lot of produce, there is another way that I learned to be smart about my food (and this I do religiously because it saves me so much time, money, waste and fridge space!)

What is my "brilliant" idea?

I write a weekly dinner menu and 

a corresponding shopping list of ingredients.


Okay, when you think about it, it's not so brilliant. It's common sense. Going to the grocery store and standing in the middle of the aisle, thinking, "What am I going to make this week?" (which is what I used to do every week) really doesn't make any sense at all. I would end up forgetting what I was going to make for dinner later on in the week because I never had actually written down the ideas that I had had to brainstorm in the midst of the grocery store. Or I would think I had ingredients that I didn't which I then needed to go out later in the week after work to go buy. Or I would get stuck making the same damn meal over and over again. Or I would end up buying a whole lotta crappy (and I mean CRAPPY) boxed or frozen previously-prepared-and-therefore-processed-with-tons-of-sugar-sodium-and-chemicals foods that literally were hurting me from the inside out. (And, no, I'm not being paranoid. Talk to a chemical engineer about what goes into our processed foods and see what she thinks about processed foods.)

I think I'm not the only one who used to do (or still does) such a ridiculous thing on a weekly basis. I think a lot of us do that very thing because we are pressured for time.

Folks, taking half an hour to an hour to plan is going to save you the same amount of time in the grocery story as well as much, much more. I promise.

SO. Here's what I do:

On Saturday or Sunday morning, as I sit with my coffee, I interrogate Chef Reiton and peruse my foodie magazines/cookbooks to decide what I/we want to make for dinner every single night that week. I write down the meals we decide on in an organized list on my phone. Below is an example. I keep a template in Notes and then update it weekly. (If I want to save a particular week because I love the meals I made and want to save them as a reminder of what to make again, I just copy and paste the whole note into a separate Weekly Dinner Menus folder.)


As I am writing up my list, meal-by-meal, I keep a separate, running "To Get" list where I write down each of the ingredients I need for each recipe (this may require popping up and checking the fridge to make sure I really do have Worcestershire sauce). 

Here is a snapshot of what I have on my "To Get" list today. Not much is on there because I only have a few random things left to get (thanks to crappy selection on earlier shopping trip and a few random things that popped up):


I try to enter the ingredients in coordinating sections to save me time running back and forth in the grocery store: produce section first, meat next, center aisle items next, then the dairy section. 

Since the list is on my phone, I never forget it. And as I shop for the ingredients, I delete them from my phone.

On the occasion that something pops up (the neighbors ask us over, we do an impromptu night out, I decide we need to eat leftovers, whatever), I bump the dinner list down a day by doing a quick copy-and-paste.

Planning my menu out for the week helps HUGELY with the following:
  • I rarely have to go to the grocery store during the week, giving me extra time at home in the evenings.
  • I always have everything I need to make the dinner I want.
  • I save time at the grocery store because I already have an organized list of what I need, so I'm in and out as quickly as possible.
  • I save money and waste because I don't buy foods that I end up not using and throwing away.
  • I usually buy ONLY what is on the list, saving me money because...it's not on the list, so I'm not buying it—unless it is something I will use later for sure AND it is on special. This way I know that I'm still saving money in the long run.
  • I save my health because I don't walk down the junk food aisles and buy bad-for-my-bod processed foods that are SO tempting when I walk down those aisles list-less-ly.
  • I save fridge space (and my sanity). You will be amazed at how streamlined your fridge gets when you only shop for what you need!
I really, REALLY encourage you to give this a try. Not only have I learned how much time, money, etc. I've saved, but it's also done so much more for me as a cook and a lover of food:
  • I actually try those recipes that I've bookmarked/dog-eared/torn out of a magazine.
  • I broaden my tastes and try recipes using ingredients from countries that aren't American (no ingredient is hard to find anymore, folks. Shopping on the internet has existed for decades now...)
  • Cooking has become a fun and rewarding (I get to EAT!) way to explore and push myself to learn new techniques, ingredients, flavor pairings, etc.
If you do take this step into streamlining your schedule and amping up your cooking, leave a comment below. We'd love to hear how you've adopted this strategy and what it's done to help you!

Related Posts Plugin for WordPress, Blogger...

Visit Me on Pinterest!